Well, hello guys. We are back with a new useful Android tutorial . In this tutorial, I will explain how you can add “horizontal swipe views”...

Well, hello guys. We are back with a new useful Android tutorial. In this tutorial, I will explain how you can add “horizontal swipe views” to your android application by using “ViewPager”. Horizontal swipe views allow app users to swipe to their left or right, and be presented with a new screen. You see this often on your home screen, in your music player apps, social networking apps (like Facebook), contacts, call logs, etc. It accounts for excellent navigation of your app, and is marginally preferred to scrolling a long page. So let's get started!
ViewPager is a new feature that is available in Android API 11+. If you want to develop using API 11- then you have to use the “Android Support Library”, you can install this package with the help of the Android SDK Manager.
Here's we've covered so far with respect to Android App Development. These tutorials cover the very basics of Android App Development. So if you know absolutely nothing about app development, you can get a good start by following these tutorials. Make sure you have set up the SDK and have a basic understanding of creating a basic Android app before moving on with this tutorial.
Part 1: How To Set up the Android SDK for App Development?
Part 2: Create Your First "Hello World" Android App
Creating Swipe Views
Step 1: Create a new Android Application project
Using Eclipse create a new Android application project (“SwipeViews”). For this tutorial I have selected API 16 (Jelly Bean).
Step 2: Create Multiple Layout Files
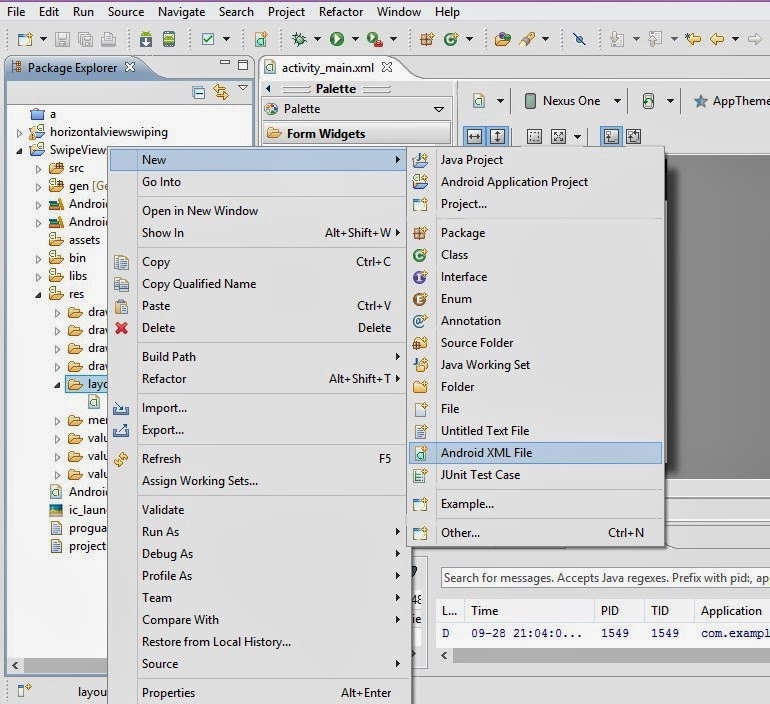
Create a new Android XML File in res/layout. For this right click Layout and select New >> Android XML File.

Set the file name as “page1”, and click finish button. Similarly, create 3 more layout files (page2, page3, and page4).

Step 3: Edit Newly Created Views
Now that you have created layout files, it’s time to add some material in them. Open “page1.xml” and copy the following code in it.
<?xml version="1.0" encoding="utf-8"?>
<LinearLayout xmlns:android="http://schemas.android.com/apk/res/android"
android:layout_width="match_parent"
android:layout_height="match_parent"
android:orientation="vertical"
android:background="#CCFF66"
>
<TextView
android:layout_width="wrap_content"
android:layout_height="match_parent"
android:text="Page3"
android:textSize="33dp"
android:layout_marginTop="22dp"
android:layout_marginLeft="22dp"
/>
</LinearLayout>
Similarly, copy the following codes to their respective XML files. You can create your own as well. For the purpose of this tutorial, we'll just use colors and text to visually differentiate pages from each other.
Page2
<?xml version="1.0" encoding="utf-8"?>
<LinearLayout xmlns:android="http://schemas.android.com/apk/res/android"
android:layout_width="match_parent"
android:layout_height="match_parent"
android:orientation="vertical"
android:background="#66FFFF"
>
<TextView
android:layout_width="wrap_content"
android:layout_height="match_parent"
android:text="Page2"
android:textSize="33dp"
android:layout_marginTop="22dp"
android:layout_marginLeft="22dp"
/>
</LinearLayout>
Page3
<?xml version="1.0" encoding="utf-8"?>
<LinearLayout xmlns:android="http://schemas.android.com/apk/res/android"
android:layout_width="match_parent"
android:layout_height="match_parent"
android:orientation="vertical"
android:background="#CCFF66"
>
<TextView
android:layout_width="wrap_content"
android:layout_height="match_parent"
android:text="Page3"
android:textSize="33dp"
android:layout_marginTop="22dp"
android:layout_marginLeft="22dp"
/>
</LinearLayout>
Page4
<?xml version="1.0" encoding="utf-8"?>
<LinearLayout xmlns:android="http://schemas.android.com/apk/res/android"
android:layout_width="match_parent"
android:layout_height="match_parent"
android:orientation="vertical"
android:background="#E0A3FF"
>
<TextView
android:layout_width="wrap_content"
android:layout_height="match_parent"
android:text="Page4"
android:textSize="33dp"
android:layout_marginTop="22dp"
android:layout_marginLeft="22dp"
/>
</LinearLayout>
Step 4: Edit MainActivity.xml
Now it’s time to edit our main activity. Open res/layout/activity_main.xml. And add
<?xml version="1.0" encoding="utf-8"?>
<LinearLayout xmlns:android="http://schemas.android.com/apk/res/android"
android:layout_width="fill_parent"
android:layout_height="fill_parent"
android:orientation="vertical" >
<android.support.v4.view.ViewPager
android:id="@+id/customviewpager"
android:layout_width="match_parent"
android:layout_height="match_parent"
/>
</LinearLayout>
You can see that, we’ve added android.ViewPager tag in main_activity.xml.
Step 5: Create a custom page adapter
Now we need to create an adapter for ViewPager. For this right-click “com.example.swipeviews” and create new class “CustomPagerAdapter”.

Add the following code after package name.
import android.content.Context;
import android.os.Parcelable;
import android.support.v4.view.PagerAdapter;
import android.support.v4.view.ViewPager;
import android.view.LayoutInflater;
import android.view.View;
public class CustomPagerAdapter extends PagerAdapter {
public Object instantiateItem(View collection, int position) {
LayoutInflater inflater = (LayoutInflater) collection.getContext().getSystemService(Context.LAYOUT_INFLATER_SERVICE);
int resId = 0;
switch (position) {
case 0: {
resId = R.layout.page1;
break;
}
case 1: {
resId = R.layout.page2;
break;
}
case 2: {
resId = R.layout.page3;
break;
}
case 3: {
resId = R.layout.page4;
break;
}
}
View view = inflater.inflate(resId, null);
((ViewPager) collection).addView(view, 0);
return view;
}
@Override
public void destroyItem(View arg0, int arg1, Object arg2) {
((ViewPager) arg0).removeView((View) arg2);
}
@Override
public boolean isViewFromObject(View arg0, Object arg1) {
return arg0 == ((View) arg1);
}
@Override
public Parcelable saveState() {
return null;
}
@Override
public int getCount() {
return 4;
}
}
If you want to add more views, simply add a new case and increment the return value of getCount().
Step 6: Edit MainActivity class.
Open MainActivity.java class. Add the following code after the package name.
import android.app.Activity;
import android.os.Bundle;
import android.support.v4.view.ViewPager;
import android.view.Menu;
public class MainActivity extends Activity {
@Override
public void onCreate(Bundle savedInstanceState) {
super.onCreate(savedInstanceState);
setContentView(R.layout.activity_main);
// Create and set adapter
CustomPagerAdapter adapter = new CustomPagerAdapter();
ViewPager myPager = (ViewPager) findViewById(R.id.customviewpager);
myPager.setAdapter(adapter);
myPager.setCurrentItem(0);
}
@Override
public boolean onCreateOptionsMenu(Menu menu) {
getMenuInflater().inflate(R.menu.activity_main, menu);
return true;
}
}
Step 7: Execute :D
Right click “SwipeViews”, and click Run As >> Android Application.

Open your app, and swipe left and right. You can see the pages change as you do so. In this way, you can create a simple yet powerful app that can provide varied functionality to the user.
Liked this tutorial? Share it with friends, and leave us feedback! Cheers :)


COMMENTS