Updated on: July 16, 2017 Tutorial to Setup Custom Domain (third-party URL) in your blog to change your blogger blog URL from .blogspot to...
Tutorial to Setup Custom Domain (third-party URL) in your blog to change your blogger blog URL from .blogspot to .com or any other top-level domain. You can also follow this tutorial if you have any problem in your custom domain or if it is not working properly.
Before proceeding further there are some terms that you should know to understand tutorial clearly.
What is the domain name?
Simply, a domain name is the string like www.example.com which point towards a website on the internet.
- Wiki
- Graphical working of DNS
Where can I buy Domain Names?
You can buy domain names from an organization or commercial entity called domain registrars. There are approx. 2943+ registrars over the internet and each of them has their own plans and prices.
| Registrar Name | $ USD | ₹ INR |
|---|---|---|
| 1and1 | $0.99 / yr | - |
| GoDaddy | $0.99 / yr | ₹299 / yr |
| NameCheap | $8.88 / yr | ₹568.67 / yr |
| Bigrock | $9.99 / yr | ₹99 / yr [SEPCOM99AFF] |
| Bluehost | $11.99 / yr | ₹749 / yr |
Note: The above given prices are for .com for 1st yr excluding additional fee (renew charges may be higher) - Updated on December 24, 2017
You can compare the price and additional features. The buying process is easy, simply enter your desired domain name and complete the payment.
You can also get free domains like .tk .ml .ga .cf .gq etc but, I suggest you to go for paid option because all free domains are not free for lifetime you have to pay a renewal fee after a period of 1 year. Moreover, very less number of people use free domains. Have you seen any?
In this tutorial, I am using GoDaddy to Setup Custom Domain in blogger. You can follow the same steps for Bigrock, NameCheap and other registrars.
Note: If you get confused with settings on other registrar's website then comment below or contact me.
Step 1. Buy Domain name for your blog from any of the above-given registrars.
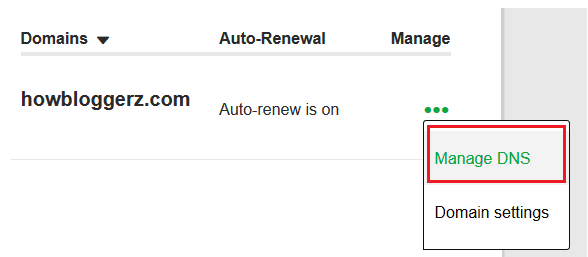
Step 2. Log-in to your account and navigate to Domains > Manage.

Step 3. Click on 'Manage DNS' .
Step 4. Open new window on your browser and log-in into your blogger account.
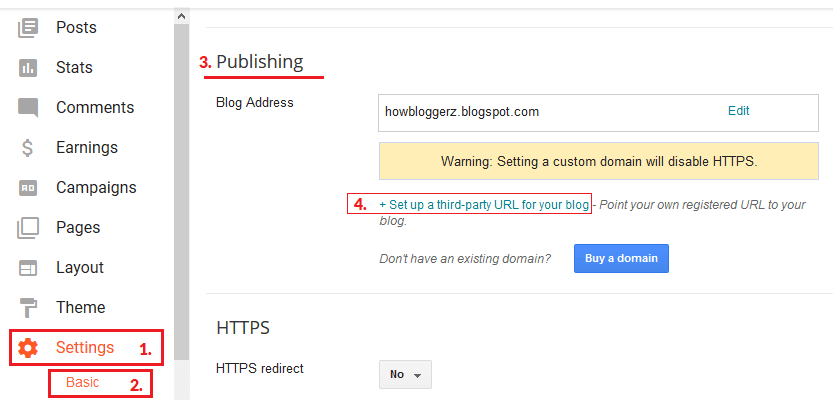
Step 5. Navigate to Settings > Basic.
Step 6. Under Publishing > Blog Address. Click on '+ Set up a third-party URL for your blog'.
Step 7. Enter your newly purchased domain name and click 'Save'.

Note: Enter www, in the beginning, to make it work.
You will see an error 'We have not been able to verify your authority to this domain. Error 12' and two CNAMEs.
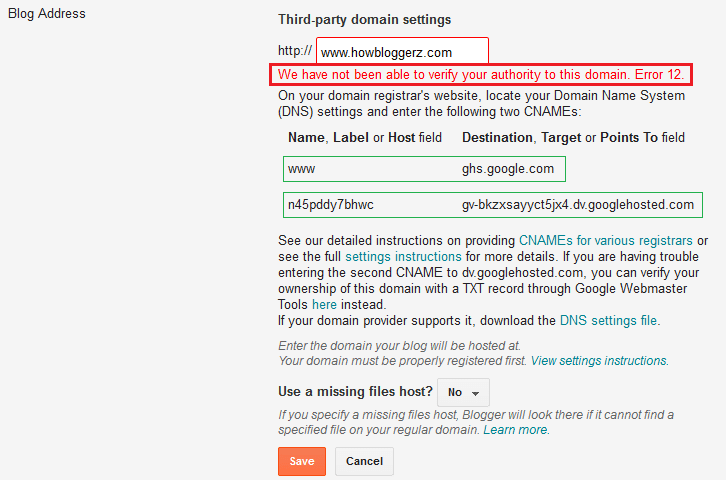
Step 8. Open DNS setting window. Click on ADD and enter the following data to create new CNAME and click 'Save'.
Note: The first CNAME is same for everyone. Also, do not edit or delete any default entries (nameservers etc) in DNS settings unless you know what are you doing.
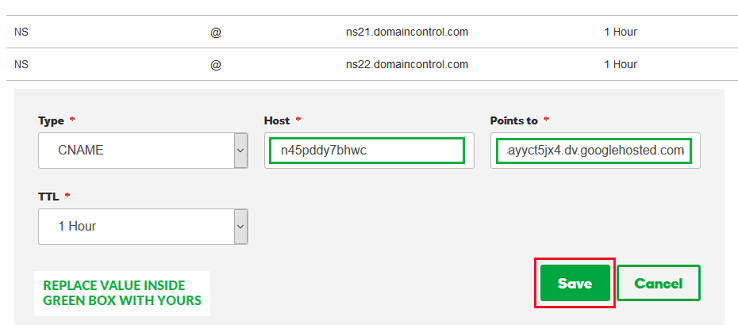
Step 9. Again, click on ADD and enter the following data.
Note: In this case replace 'Host' and 'Points to' with the one given to you (open blogger window to find yours and then copy-paste it)
then click save.
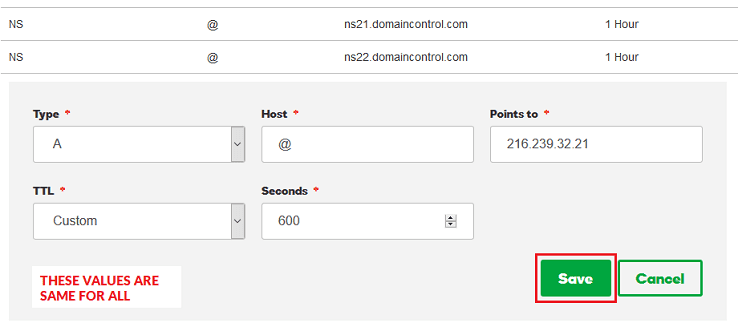
Step 10. Again, click on ADD and enter the following data and then click save.
Step 11. Follow the same steps to add three more records with type 'A' and Host '@'. Just replace 'Points to' with these values.
216.239.34.21
216.239.36.21
216.239.38.21
Step 12. Now wait for an hour for your DNS setting to get activated.
Step 13. Follow step 7 again. This time there will be no error.
Read: How to Make My Blog Visible in Google Search Result
That’s it
You have successfully setup custom domain on blogger. Your blogspot.com address will be changed to your new custom domain. Be patient, as it might take up to 24 hours for the redirect to start working. If you're still seeing an error after 24 hours, it means your settings weren't entered correctly and you should try the process again. Comment bellow for any other issue. Stay Updated, Browse Howbloggerz! :)




COMMENTS